|
|
| Home | All Classes | Main Classes | Annotated | Grouped Classes | Functions |
In this example, we introduce painting in a pixmap to remove flickering. We also add a force control.
The CannonField now has a force value in addition to the angle.
        int   angle() const { return ang; }
        int   force() const { return f; }

    public slots:
        void  setAngle( int degrees );
        void  setForce( int newton );

    signals:
        void  angleChanged( int );
        void  forceChanged( int );
The interface to the force follows the same practice as for the angle.
    private:
        QRect cannonRect() const;
We have put the definition of the cannon's enclosing rectangle in a separate function.
        int ang;
        int f;
    };
The force is stored in the integer f.
#include <qpixmap.h>
We include the QPixmap class definition.
    CannonField::CannonField( QWidget *parent, const char *name )
            : QWidget( parent, name )
    {
        ang = 45;
        f = 0;
        setPalette( QPalette( QColor( 250, 250, 200) ) );
    }
The force (f) is initialized to zero.
    void CannonField::setAngle( int degrees )
    {
        if ( degrees < 5 )
            degrees = 5;
        if ( degrees > 70 )
            degrees = 70;
        if ( ang == degrees )
            return;
        ang = degrees;
        repaint( cannonRect(), FALSE );
        emit angleChanged( ang );
    }
We have made a slight change in the setAngle() function. It repaints only the portion of the widget that contains the cannon. The FALSE argument indicates that the specified rectangle should not be erased before a paint event is sent to the widget. This speeds up and smooths the drawing a little bit.
    void CannonField::setForce( int newton )
    {
        if ( newton < 0 )
            newton = 0;
        if ( f == newton )
            return;
        f = newton;
        emit forceChanged( f );
    }
The implementation of setForce() is quite similar to that of setAngle(). The only difference is that because we don't show the force value, we don't need to repaint the widget.
    void CannonField::paintEvent( QPaintEvent *e )
    {
        if ( !e->rect().intersects( cannonRect() ) )
            return;
We have now optimized the paint event to repaint only the parts of the widget that need updating. First we check whether we have to paint anything at all, and we return if we don't.
        QRect cr = cannonRect();
        QPixmap pix( cr.size() );
Then we create a temporary pixmap, which we use for flicker-free painting. All the painting operations are done into this pixmap, and then the pixmap is drawn on the screen in a single operation.
This is the essence of flicker-free drawing: Draw on each pixel precisely once. Less, and you get drawing errors. More, and you get flicker. It doesn't matter much in this example - when the code was written there were still machines slow enough for it to flicker, but not any more. We've kept the code for educational purposes.
pix.fill( this, cr.topLeft() );
We fill the pixmap with the background from this widget.
        QPainter p( &pix );
        p.setBrush( blue );
        p.setPen( NoPen );
        p.translate( 0, pix.height() - 1 );
        p.drawPie( QRect( -35,-35, 70, 70 ), 0, 90*16 );
        p.rotate( -ang );
        p.drawRect( QRect(33, -4, 15, 8) );
        p.end();
We paint, as in Chapter 9, but now we paint in the pixmap.
At this point, we have a painter variable and a pixmap that looks precisely right, but we still haven't painted on the screen.
        p.begin( this );
        p.drawPixmap( cr.topLeft(), pix );
So we open the painter on the CannonField itself and then draw the pixmap.
That's all. A couple of extra lines at the top and a couple at the bottom, and the code is 100% flicker-free.
    QRect CannonField::cannonRect() const
    {
        QRect r( 0, 0, 50, 50 );
        r.moveBottomLeft( rect().bottomLeft() );
        return r;
    }
This function returns the rectangle enclosing the cannon in widget coordinates. First we create a rectangle with the size 50x50 and then move it so its bottom left corner is equal to the widget's own bottom- left corner.
The QWidget::rect() function returns the widget's enclosing rectangle in the widget's own coordinates (where the top left corner is 0, 0).
    MyWidget::MyWidget( QWidget *parent, const char *name )
            : QWidget( parent, name )
    {
The constructor is mostly the same, but some new bits have been added.
        LCDRange *force  = new LCDRange( this, "force" );
        force->setRange( 10, 50 );
We add a second LCDRange, which will be used to set the force.
        connect( force, SIGNAL(valueChanged(int)),
                 cannonField, SLOT(setForce(int)) );
        connect( cannonField, SIGNAL(forceChanged(int)),
                 force, SLOT(setValue(int)) );
We connect the force widget and the cannonField widget, just like we did for the angle widget.
        QVBoxLayout *leftBox = new QVBoxLayout;
        grid->addLayout( leftBox, 1, 0 );
        leftBox->addWidget( angle );
        leftBox->addWidget( force );
In Chapter 9 we put angle in the lower-left cell of the layout. Now we want to have two widgets in that cell, so we make a vertical box, put the vertical box in the grid cell, and put each of angle and range in the vertical box.
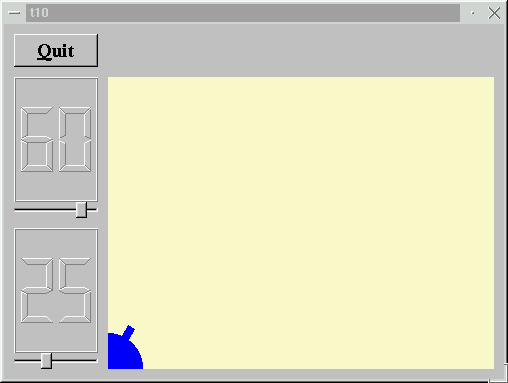
force->setValue( 25 );
We initialize the force value to 25.
The flicker has gone and we have a force control.
(See Compiling for how to create a makefile and build the application.)
Make the size of the cannon barrel be dependent on the force.
Put the cannon in the bottom-right corner.
Try adding a better keyboard interface. For example, make + and - increase and decrease the force and enter shoot. Hint: QAccel and new addStep() and subtractStep() slots in LCDRange, like QSlider::addStep(). If you're bothered by the way the left and right keys work (I am!), change that too.
You're now ready for Chapter 11.
[Previous tutorial] [Next tutorial] [Main tutorial page]
| Copyright © 2007 Trolltech | Trademarks | Qt 3.3.8
|