|
|
| Home | All Classes | Main Classes | Annotated | Grouped Classes | Functions |
This example shows how to create custom widgets with signals and slots, and how to connect them together in more complex ways. For the first time, the source is split among several files which we've placed in the t7 subdirectory.
This file is mainly lifted from main.cpp in Chapter 6; only the changes are noted here.
    #ifndef LCDRANGE_H
    #define LCDRANGE_H
This is the classic C construction to avoid errors if a header file happens to be included more than once. If you don't use it already, it is a very good habit to develop. The #ifndef should enclose all of the header file.
#include <qvbox.h>
qvbox.h is included. LCDRange inherits QVBox, and the header file of a parent class must always be included. We cheated a bit in the previous chapters, and we let qwidget.h be included indirectly via other header files such as qpushbutton.h.
class QSlider;
This is another classic trick, but one that's much less used often. Because we don't need QSlider in the interface of the class, only in the implementation, we use a forward declaration of the class in the header file and include the header file for QSlider in the .cpp file.
This makes the compilation of big projects much faster, because when a header file has changed, fewer files need to be recompiled. It can often speed up big compilations by a factor of two or more.
    class LCDRange : public QVBox
    {
        Q_OBJECT
    public:
        LCDRange( QWidget *parent=0, const char *name=0 );
Note the Q_OBJECT. This macro must be included in all classes that contain signals and/or slots. If you are curious, it defines the functions that are implemented in the meta object file.
        int value() const;
    public slots:
        void setValue( int );

    signals:
        void valueChanged( int );
These three members make up an interface between this widget and other components in a program. Until now, LCDRange didn't really have an interface at all.
value() is a public function for accessing the value of the LCDRange. setValue() is our first custom slot and valueChanged() is our first custom signal.
Slots must be implemented in the normal way (remember that a slot is also a C++ member function). Signals are automatically implemented in the meta object file. Signals follow the access rules of protected C++ functions (i.e., they can be emitted only by the class they are defined in or by classes inheriting from it).
The signal valueChanged() is used when the LCDRange's value has changed - just as you guessed from the name. This is not the last signal you'll see called somethingChanged().
This file is mainly lifted from t6/main.cpp, and only the changes are noted here.
        connect( slider, SIGNAL(valueChanged(int)),
                 lcd, SLOT(display(int)) );
        connect( slider, SIGNAL(valueChanged(int)),
                 SIGNAL(valueChanged(int)) );
This code is from the LCDRange constructor.
The first connect is the same that you have seen in the previous chapter. The second is new; it connects slider's valueChanged() signal to this object's valueChanged signal. Connect() with 3 arguments always connects to signals or slots in this object.
Yes, that's right. Signals can be connected to other signals. When the first is emitted, the second signal is also emitted.
Let's look at what happens when the user operates the slider. The slider sees that its value has changed and emits the valueChanged() signal. That signal is connected both to the display() slot of the QLCDNumber and to the valueChanged() signal of the LCDRange.
Thus, when the signal is emitted, LCDRange emits its own valueChanged() signal. In addition, QLCDNumber::display() is called and shows the new number.
Note that you're not guaranteed any particular order of execution - LCDRange::valueChanged() may be emitted before or after QLCDNumber::display()and is entirely arbitrary.
    int LCDRange::value() const
    {
        return slider->value();
    }
The implementation of value() is straightforward; it simply returns the slider's value.
    void LCDRange::setValue( int value )
    {
        slider->setValue( value );
    }
The implementation of setValue() is equally straightforward. Note that because the slider and LCD number are connected, setting the slider's value automatically updates the LCD number as well. In addition, the slider will automatically adjust the value if it is outside its legal range.
        LCDRange *previous = 0;
        for( int r = 0 ; r < 4 ; r++ ) {
            for( int c = 0 ; c < 4 ; c++ ) {
                LCDRange* lr = new LCDRange( grid );
                if ( previous )
                    connect( lr, SIGNAL(valueChanged(int)),
                             previous, SLOT(setValue(int)) );
                previous = lr;
            }
        }
All of main.cpp is copied from the previous chapter except in the constructor for MyWidget. When we create the 16 LCDRange object, we now connect them using the signal/slot mechanism. Each has its valueChanged() signal connected to the setValue() slot in the previous one. Because LCDRange emits the signal valueChanged() when its value changes (surprise!), we are here creating a "chain" of signals and slots.
Creating a makefile for a multi-file application is no different from creating one for a single-file application. If you've saved all the files in this example in their own directory, all you have to do is:
qmake -project
qmake
The first command tells qmake to create a .pro (project) file. The second command tells it to create a (platform-specific) makefile based on the project file. You should now be able to type make (or nmake if you're using Visual Studio) to build your application.
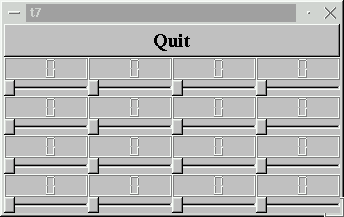
On startup, the program's appearance is identical to the previous one. Try operating the slider to the bottom right...
Use the bottom right slider to set all LCDs to 50. Then set the top half to 40 by clicking once to the left of the slider handle. Now, use the one to the left of the last one operated to set the first seven LCDs back to 50.
Click to the left of the handle on the bottom right slider. What happens? Why is this the correct behavior?
You're now ready for Chapter 8.
[Previous tutorial] [Next tutorial] [Main tutorial page]
| Copyright © 2007 Trolltech | Trademarks | Qt 3.3.8
|