 Switch
and enter the name of the calendar to which you wish to switch.
You can select from a point-and-pick list of all existing calendar names by
pressing <F3>, or you can select from a list of login names by pressing <F5>.
Switch
and enter the name of the calendar to which you wish to switch.
You can select from a point-and-pick list of all existing calendar names by
pressing <F3>, or you can select from a list of login names by pressing <F5>.
|
|
Using the functions from the Options menu, you can:
You can access calendars associated with other individuals, particular projects, events, or groups of people, provided that you have view, schedule, or full-access permissions for those calendars. If your computer is on a local network, you may have direct access to the calendars of users who work on other computers on the network.
By default, you can view anyone else's calendar.
The owner of a calendar must specifically deny view access to prevent viewing.
To access another calendar, select
Options Switch
and enter the name of the calendar to which you wish to switch.
You can select from a point-and-pick list of all existing calendar names by
pressing <F3>, or you can select from a list of login names by pressing <F5>.
If you schedule an event while you are switched to this calendar, mail is sent to all the invitees from your login name, not from the calendar to which you are currently switched. However, the event is owned by the current calendar not by you. For example, if user jane switches to user diane's calendar and schedules an event, the invitees receive mail from jane, not diane. However, the event is owned by diane.
If you do not have schedule permission, the Calendar program tells you so. You can view the calendar, but you cannot make any changes to it.
If you do not have at least blind view permission on the calendar that you want to switch to, you are given the message that you do not have view permission. If this is the case, you are not allowed to switch to the new calendar. You must press <Enter> to return to the calendar from which you attempted to switch.
For more information on permissions, see ``Setting permissions on the current calendar''.
Make allows you to create new calendars. In addition to calendars associated with users, you can create calendars associated with a project, task, or group of users. Calendars can also be associated with shared resources, such as conference rooms, slide projectors, and other equipment.
When you select Make, you are asked for the name of the new calendar. The new name must be no more than 15 characters long without any spaces. (If a calendar by that name already exists, you are given a message to that effect. You must then press <Enter> to return to the Calendar menu.)
You can now schedule events with this calendar in the same way that you schedule events with other users. For example, if you need a particular room and a slide projector for your meeting, put the names of the calendars for the room and the projector in the ``Who'' field of the Repeat or Search form, just as you would for any other invitees. The calendar checks the schedules of these resources to find a common free time. When you select a date and time, the resources, as well as the invitees, are scheduled to attend your meeting.
The calendars created with Make are not associated with any particular user. The initial view and schedule permissions are set to allow all users access to a calendar. By default, only the owner of the Calendar is allowed full access. To learn how to change the view, schedule, or full-access permissions, see ``Setting permissions on the current calendar''.
Because these calendars are not associated with a particular
user, mail regarding the scheduling of the event cannot be sent.
These calendars cannot receive mailed copies of schedules for
the same reason.
To change the appearance of the Calendar display, select:
Options Preferences
When you are through choosing Calendar preferences, press <Enter> or <Ctrl>X to return to the Calendar menu.
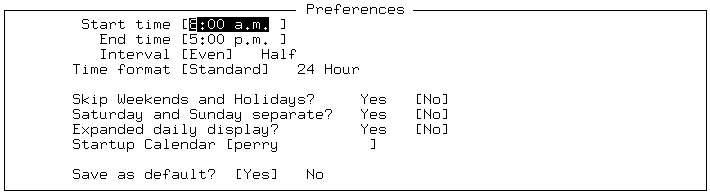
Here is a brief explanation of each of the fields in the Preferences form:
| Field | Description |
|---|---|
| Start time | The time of day when you start scheduling events. The default is 8:00 a.m. |
| End time | The time of day when you stop scheduling events. The default is 5:00 p.m. |
| Interval | Display the calendar in one-hour increments (``Even'', the default), or in half-hour increments (``Half''). |
| Time format | Display the time in a.m. or p.m. format (``Standard'', the default), or in 24-hour international format (``24 Hour''). |
| Skip Weekends and Holidays | Skip (``Yes'') or include (``No'', the default) weekends and holidays when using the Next and Back options, and when using the Search command. |
| Saturday and Sunday separate | Place Saturdays and Sundays in separate boxes (``Yes''), or the same box (``No'', the default), on the monthly calendar. |
| Expanded daily display | Include (``Yes'') , or does not include (``No'', the default), details about the event and who is invited to it in the daily calendar display. |
| Startup Calendar | The calendar invoked when you start the Calendar program. The default is the calendar corresponding to your user name. To switch calendars while running the Calendar program, select Options -> Switch. |
| Save as default | Save the selections made in the Preferences form as the default (``Yes'', the default), or return to the default preferences when you quit the calendar (``No''). |
By default, the access
permissions allow each user
to have blind view, view, and schedule
access to another user's calendar, and only
allow the owner of a calendar full access.
You can change the permissions to allow only
certain users or groups of users (aliases)
blind view, view, schedule, or full-access permission on your calendar
by selecting:
Options Configure
The Calendar displays the Configure form:
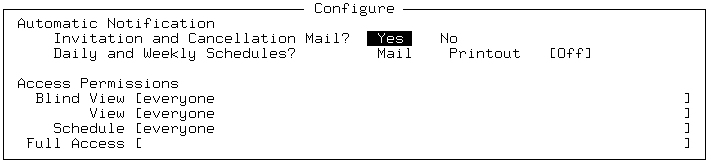
Here is a brief explanation of each of the fields in the Configure form:
| Field | Description |
|---|---|
| Invitation and Cancellation Mail | Set to ``Yes'' to specify that you want to be notified when others change your calendar. Also, if you cancel an event to which others were invited, a mail message, explaining the cancellation with up to two lines of descriptive text, is generated automatically. If set to ``No'', no mail is sent. |
| Daily and Weekly Schedules | Set to ``Print'' or ``Mail'' if you want to generate automatically a printed or mailed copy of your daily and weekly schedules. If you have chosen and saved the expanded daily calendar display in ``Preferences'' as default, then the copy will also be expanded. |
| Blind View | Specify who can see when events are scheduled but not the details. |
| View | Specify who can see the details of events. |
| Schedule | Specify who can add events. |
| Full Access | Specify who can change and delete events. |
Use Erase to clear all events from the calendar you are currently using. You might want to do this for a meeting room that is no longer available for use.
Once a calendar's events have been erased, they cannot be retrieved. You should thus be very careful when using Erase.
Before using this option, switch to the calendar you want to erase using
Option Switch
, then choose
Options Erase
.
Because you cannot undo this action once it has been confirmed, you are given two chances to change your mind and not erase the calendar.
If the calendar you deleted was your personal calendar, it remains on the screen with no events listed. Otherwise, it is removed entirely and you automatically return to your personal calendar.
Rename allows you to rename any calendar made as described in ``Creating a new calendar'' and for which you have full-access permission. You cannot rename your personal calendar.
To rename the current calendar, select
Options Rename
.
Erasing or renaming a calendar does not change the contents of the ``Who'' fields of any other users' calendars.
An alias is a name used by the Calendar to refer to a group of users. Use Alias to create, modify, and delete calendar aliases. To use an alias, type the alias name in the ``Who'' field of the forms presented by the Calendar. When you schedule an event for an alias, mail is automatically sent to all the people on the alias, notifying them of the event.
There are two types of aliases: private and system. Private aliases are made and controlled by you, and only you have access to them. Only the system administrator can set up and edit system aliases.
To edit, delete, and create new private aliases,
select:
Options Alias
When you select Alias, a list of your private aliases appears along with a menu. The items on the Alias menu allow you to: