|
|
| Home | All Classes | Main Classes | Annotated | Grouped Classes | Functions |
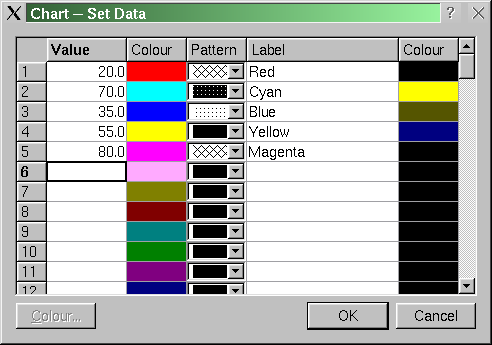
The set data dialog allows the user to add and edit values, and to choose the color and pattern used to display values. Users can also enter label text and choose a label color for each label.
(Extracts from setdataform.h.)
    class SetDataForm: public QDialog
    {
        Q_OBJECT
    public:
        SetDataForm( ElementVector *elements, int decimalPlaces,
                     QWidget *parent = 0, const char *name = "set data form",
                     bool modal = TRUE, WFlags f = 0 );
        ~SetDataForm() {}

    public slots:
        void setColor();
        void setColor( int row, int col );
        void currentChanged( int row, int col );
        void valueChanged( int row, int col );

    protected slots:
        void accept();

    private:
        QTable *table;
        QPushButton *colorPushButton;
        QPushButton *okPushButton;
        QPushButton *cancelPushButton;

    protected:
        QVBoxLayout *tableButtonBox;
        QHBoxLayout *buttonBox;

    private:
        ElementVector *m_elements;
        int m_decimalPlaces;
    };
The header file is simple. The constructor takes a pointer to the element vector so that this "smart" dialog can display and edit the data directly. We'll explain the slots as we look through the implementation.
(Extracts from setdataform.cpp.)
    #include "images/pattern01.xpm"
    #include "images/pattern02.xpm"
We have created a small .XPM image to show each brush pattern that Qt supports. We'll use these in the pattern combobox.
    SetDataForm::SetDataForm( ElementVector *elements, int decimalPlaces,
                              QWidget* parent,  const char* name,
                              bool modal, WFlags f )
        : QDialog( parent, name, modal, f )

    {
        m_elements = elements;
        m_decimalPlaces = decimalPlaces;
We pass most of the arguments to the QDialog superclass. We assign the elements vector pointer and the number of decimal places to display to member variables so that they are accessible by all SetDataForm's member functions.
        setCaption( "Chart -- Set Data" );
        resize( 540, 440 );
We set a caption for the dialog and resize it.
tableButtonBox = new QVBoxLayout( this, 11, 6, "table button box layout" );
The layout of the form is quite simple. The buttons will be grouped together in a horizontal layout and the table and the button layout will be grouped together vertically using the tableButtonBox layout.
        table = new QTable( this, "data table" );
        table->setNumCols( 5 );
        table->setNumRows( ChartForm::MAX_ELEMENTS );
        table->setColumnReadOnly( 1, TRUE );
        table->setColumnReadOnly( 2, TRUE );
        table->setColumnReadOnly( 4, TRUE );
        table->setColumnWidth( 0, 80 );
        table->setColumnWidth( 1, 60 ); // Columns 1 and 4 must be equal
        table->setColumnWidth( 2, 60 );
        table->setColumnWidth( 3, 200 );
        table->setColumnWidth( 4, 60 );
        QHeader *th = table->horizontalHeader();
        th->setLabel( 0, "Value" );
        th->setLabel( 1, "Color" );
        th->setLabel( 2, "Pattern" );
        th->setLabel( 3, "Label" );
        th->setLabel( 4, "Color" );
        tableButtonBox->addWidget( table );
We create a new QTable with five columns, and the same number of rows as we have elements in the elements vector. We make the color and pattern columns read only: this is to prevent the user typing in them. We will make the color changeable by the user clicking on a color or navigating to a color and clicking the Color button. The pattern will be in a combobox, changeable simply by the user selecting a different pattern. Next we set suitable initial widths, insert labels for each column and finally add the table to the tableButtonBox layout.
buttonBox = new QHBoxLayout( 0, 0, 6, "button box layout" );
We create a horizontal box layout to hold the buttons.
        colorPushButton = new QPushButton( this, "color button" );
        colorPushButton->setText( "&Color..." );
        colorPushButton->setEnabled( FALSE );
        buttonBox->addWidget( colorPushButton );
We create a color button and add it to the buttonBox layout. We disable the button; we will only enable it when the focus is actually on a color cell.
        QSpacerItem *spacer = new QSpacerItem( 0, 0, QSizePolicy::Expanding,
                                                     QSizePolicy::Minimum );
        buttonBox->addItem( spacer );
Since we want to separate the color button from the OK and Cancel buttons we next create a spacer and add that to the buttonBox layout.
        okPushButton = new QPushButton( this, "ok button" );
        okPushButton->setText( "OK" );
        okPushButton->setDefault( TRUE );
        buttonBox->addWidget( okPushButton );

        cancelPushButton = new QPushButton( this, "cancel button" );
        cancelPushButton->setText( "Cancel" );
        cancelPushButton->setAccel( Key_Escape );
        buttonBox->addWidget( cancelPushButton );
The OK and Cancel buttons are created and added to the buttonBox. We make the OK button the dialog's default button, and we make the Esc key an accelerator for the Cancel button.
tableButtonBox->addLayout( buttonBox );
We add the buttonBox layout to the tableButtonBox and the layout is complete.
        connect( table, SIGNAL( clicked(int,int,int,const QPoint&) ),
                 this, SLOT( setColor(int,int) ) );
        connect( table, SIGNAL( currentChanged(int,int) ),
                 this, SLOT( currentChanged(int,int) ) );
        connect( table, SIGNAL( valueChanged(int,int) ),
                 this, SLOT( valueChanged(int,int) ) );
        connect( colorPushButton, SIGNAL( clicked() ), this, SLOT( setColor() ) );
        connect( okPushButton, SIGNAL( clicked() ), this, SLOT( accept() ) );
        connect( cancelPushButton, SIGNAL( clicked() ), this, SLOT( reject() ) );
We now "wire up" the form.
        QPixmap patterns[MAX_PATTERNS];
        patterns[0]  = QPixmap( pattern01 );
        patterns[1]  = QPixmap( pattern02 );
We create a pixmap for every brush pattern and store them in the patterns array.
        QRect rect = table->cellRect( 0, 1 );
        QPixmap pix( rect.width(), rect.height() );
We obtain the rectangle that will be occupied by each color cell and create a blank pixmap of that size.
        for ( int i = 0; i < ChartForm::MAX_ELEMENTS; ++i ) {
            Element element = (*m_elements)[i];

            if ( element.isValid() )
                table->setText(
                    i, 0,
                    QString( "%1" ).arg( element.value(), 0, 'f',
                                         m_decimalPlaces ) );

            QColor color = element.valueColor();
            pix.fill( color );
            table->setPixmap( i, 1, pix );
            table->setText( i, 1, color.name() );

            QComboBox *combobox = new QComboBox;
            for ( int j = 0; j < MAX_PATTERNS; ++j )
                combobox->insertItem( patterns[j] );
            combobox->setCurrentItem( element.valuePattern() - 1 );
            table->setCellWidget( i, 2, combobox );

            table->setText( i, 3, element.label() );

            color = element.labelColor();
            pix.fill( color );
            table->setPixmap( i, 4, pix );
            table->setText( i, 4, color.name() );
For each element in the element vector we must populate the table.
If the element is valid we write its value in the first column (column 0, Value), formatting it with the specified number of decimal places.
We read the element's value color and fill the blank pixmap with that color; we then set the color cell to display this pixmap. We need to be able to read back the color later (e.g. if the user changes it). One way of doing this would be to examine a pixel in the pixmap; another way would be to subclass QTableItem (in a similar way to our CanvasText subclass) and store the color there. But we've taken a simpler route: we set the cell's text to the name of the color.
Next we populate the pattern combobox with the patterns. We will use the position of the chosen pattern in the combobox to determine which pattern the user has selected. QTable can make use of QComboTableItem items; but these only support text, so we use setCellWidget() to insert QComboBox's into the table instead.
Next we insert the element's label. Finally we set the label color in the same way as we set the value color.
    void SetDataForm::currentChanged( int, int col )
    {
        colorPushButton->setEnabled( col == 1 || col == 4 );
    }
As the user navigates through the table currentChanged() signals are emitted. If the user enters column 1 or 4 (value color or label color) we enable the colorPushButton; otherwise we disable it.
    void SetDataForm::valueChanged( int row, int col )
    {
        if ( col == 0 ) {
            bool ok;
            double d = table->text( row, col ).toDouble( &ok );
            if ( ok && d > EPSILON )
                table->setText(
                    row, col, QString( "%1" ).arg(
                                d, 0, 'f', m_decimalPlaces ) );
            else if ( !table->text( row, col ).isEmpty() )
                table->setText( row, col, table->text( row, col ) + "?" );
        }
    }
If the user changes the value we must format it using the correct number of decimal places, or indicate that it is invalid.
    void SetDataForm::setColor()
    {
        setColor( table->currentRow(), table->currentColumn() );
        table->setFocus();
    }
If the user presses the Color button we call the other setColor() function and put the focus back into the table.
    void SetDataForm::setColor( int row, int col )
    {
        if ( !( col == 1 || col == 4 ) )
            return;

        QColor color = QColorDialog::getColor(
                            QColor( table->text( row, col ) ),
                            this, "color dialog" );
        if ( color.isValid() ) {
            QPixmap pix = table->pixmap( row, col );
            pix.fill( color );
            table->setPixmap( row, col, pix );
            table->setText( row, col, color.name() );
        }
    }
If this function is called with the focus on a color cell we call the static QColorDialog::getColor() dialog to get the user's choice of color. If they chose a color we fill the color cell's pixmap with that color and set the cell's text to the new color's name.
    void SetDataForm::accept()
    {
        bool ok;
        for ( int i = 0; i < ChartForm::MAX_ELEMENTS; ++i ) {
            Element &element = (*m_elements)[i];
            double d = table->text( i, 0 ).toDouble( &ok );
            if ( ok )
                element.setValue( d );
            else
                element.setValue( Element::INVALID );
            element.setValueColor( QColor( table->text( i, 1 ) ) );
            element.setValuePattern(
                    ((QComboBox*)table->cellWidget( i, 2 ))->currentItem() + 1 );
            element.setLabel( table->text( i, 3 ) );
            element.setLabelColor( QColor( table->text( i, 4 ) ) );
        }

        QDialog::accept();
    }
If the user clicks OK we must update the elements vector. We iterate over the vector and set each element's value to the value the user has entered or INVALID if the value is invalid. We set the value color and the label color by constructing QColor temporaries that take a color name as argument. The pattern is set to the pattern combobox's current item with an offset of 1 (since our pattern numbers begin at 1, but the combobox's items are indexed from 0).
Finally we call QDialog::accept().
« File Handling | Contents | Setting Options »
| Copyright © 2007 Trolltech | Trademarks | Qt 3.3.8
|