![]()
![]()
![]()
![]()
|
|
When connecting Unix and Linux servers and clients, configuration via the setkey/ipseckey and racoon tools is the most common interface. This is often called "Raw IPsec" to distinguish it from the various Virtual Private Network (VPN) clients that use the L2TP and PTPP protocols. These protocols are not supported in this implementation.
In this section we concentrate on Windows VPN clients, as this is the most likely software for a roaming laptop client to use. These clients are generally easier to configure and maintain than the Raw IPsec interfaces and tools found on the various versions of Windows.
In this example, we are configuring a VPN connection with the following characteristics:
The configuration in this example uses a roaming client running Windows 98 and a SonicWALL VPN Client (Version 8.0.0; SafeNet, Inc.). This is a popular VPN client with an interface and tools that make it flexible and easy to configure. If you are using another client, check the documentation that comes with the client to configure the client similarly.
The server in this configuration is acting as a peer: it is not routing packets to a private intranet, and the client is only accessing resources (web pages, remote terminal connections, etc.) on the server.
In a configuration where the server also acts as a gateway to an intranet, and you do not want the IP addresses of the systems on the intranet publicly exposed in the header, you should use Tunnel Mode. See ``Scenario 2: Tunnel Mode: Peer to Peer'' for an example of using Tunnel Mode in a gateway-to-client situation.
Certificates could be added to this example in the same manner used in ``Configuring racoon for Private Keys and Certificates'' once your configuration is initially tested.
On the server, do the following:
   spdadd server-ip-address 0.0.0.0 any -P out ipsec
            ah/transport//require
           esp/transport//require;
   spdadd 0.0.0.0 server-ip-address any -P in ipsec
            ah/transport//require
           esp/transport//require;
Note the "0.0.0.0" above. This indicates that the IP address of the client will be determined from the packet header once a connection is authenticated.
ipseckey -f /etc/inet/ipsec.conf
   path pre_shared_key "/etc/inet/psk.txt" ;
   #
   timer {
   	phase1 60 seconds ;
   	phase2 60 seconds ;
   }
   #
   remote anonymous {
           exchange_mode main, aggressive, base ;
   	doi ipsec_doi ;
   	situation identity_only ;
   	lifetime time 1 hour ;
           generate_policy on;
           passive on;
           my_identifier address server-ip-address ;
   	peers_identifier fqdn "domain-name" ;
           proposal {
                   encryption_algorithm 3des;
                   hash_algorithm sha1;
                   authentication_method pre_shared_key;
                   dh_group modp1024;
           }
   	proposal_check obey ;
   }
   #
   sainfo anonymous {
           pfs_group modp1024;
   	lifetime time 1 hour ;
   	encryption_algorithm 3des, blowfish;
      	authentication_algorithm hmac_sha1, hmac_md5;
           compression_algorithm deflate;
   }
domain-name public-key
For example:
iii.com mypublickey
This must match the domain-name used above in racoon.conf as well as the domain name used to configure the client, as shown later in this procedure. The domain name need not be defined on any DNS server; it is used only to pick the correct key from the psk.txt file and can be fictional.
tail -f /var/adm/syslog
racoon [-d][d]
Include the -d option during testing to increase the amount of information written to /var/adm/syslog; -dd provides even more detail in the log. [Turn this off for production use to prevent your syslog file from filling up with diagnostic messages.]
Check the syslog output from the previous step. Correct errors as necessary if racoon fails to start. To restart racoon, it may be necessary to delete the file /tmp/.racoon, as shown:
rm -f /tmp/.racoon
Successful startup is indicated by messages like the following in /var/adm/syslog:
   Oct 12 14:09:23 relent racoon: INFO: main.c:220: @(#)This product
    linked OpenSSL 0.9.7d 17 Mar 2004 (http://www.openssl.org/)
   Oct 12 14:09:24 relent racoon: INFO: sockmisc.c:635:
    setsockopt_bypass: in bypass
   Oct 12 14:09:24 relent racoon: INFO: sockmisc.c:660:
    setsockopt_bypass: out bypass
   Oct 12 14:09:25 relent racoon: INFO: isakmp.c:1379:
    server-ip-address[500] used as isakmp port (fd=9)
   Oct 12 14:09:25 relent racoon: INFO: sockmisc.c:635:
    setsockopt_bypass: in bypass
   Oct 12 14:09:25 relent racoon: INFO: sockmisc.c:660:
    setsockopt_bypass: out bypass
   Oct 12 14:09:25 relent racoon: INFO: isakmp.c:1379:
    server-ip-address[500] used as isakmp port (fd=10)
   Oct 12 14:09:25 relent racoon: INFO: sockmisc.c:635:
    setsockopt_bypass: in bypass
   Oct 12 14:09:25 relent racoon: INFO: sockmisc.c:660:
    setsockopt_bypass: out bypass
   Oct 12 14:09:25 relent racoon: INFO: isakmp.c:1379: 127.0.0.1[500]
    used as isakm p port (fd=11)
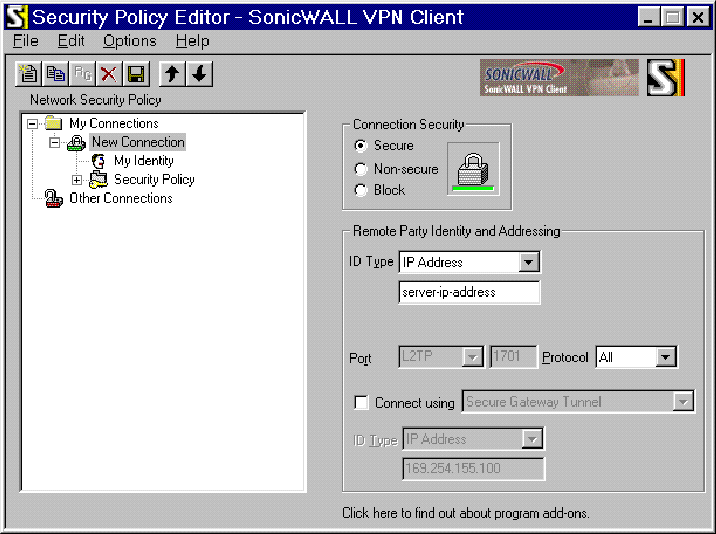
Once racoon has successfully started on the server, configure the Windows client. The following figures show the configuration screens for the SonicWALL client.
![]()
![]()
![]()
![]()
Once both server and client are setup, generate some traffic between the systems using ssh, telnet, mozilla, etc. Check in /var/adm/syslog on the server and the client's log for connection messages.
The following example modifies the configuration used in the previous example by adding tunnel mode to the configuration. This encapsulates the entire packet for transmission, not just the payload, so that the packet header cannot be read during transmission. The necessary changes are in the ipsec.conf file and on the Windows client.
   spdadd server-ip-address 0.0.0.0 any -P out ipsec
           esp/tunnel/server-ip-address-0.0.0.0/require;
   spdadd 0.0.0.0 server-ip-address any -P in ipsec
           esp/tunnel/0.0.0.0-server-ip-address/require;
Note that we now specify tunnel instead of transport, and that we include the IP addresses in the esp line. The "0.0.0.0" indicates that the IP address of the client will be determined from the packet header once a connection is authenticated.
ipseckey -f /etc/inet/ipsec.conf
   path pre_shared_key "/etc/inet/psk.txt" ;
   #
   timer {
   	phase1 60 seconds ;
   	phase2 60 seconds ;
   }
   #
   remote anonymous {
           exchange_mode main, aggressive, base ;
   	doi ipsec_doi ;
   	situation identity_only ;
   	lifetime time 1 hour ;
           generate_policy on;
           passive on;
           my_identifier address server-ip-address ;
   	peers_identifier fqdn "domain-name" ;
           proposal {
                   encryption_algorithm 3des;
                   hash_algorithm sha1;
                   authentication_method pre_shared_key;
                   dh_group modp1024;
           }
   	proposal_check obey ;
   }
   #
   sainfo anonymous {
           pfs_group modp1024;
   	lifetime time 1 hour ;
   	encryption_algorithm 3des, blowfish;
      	authentication_algorithm hmac_sha1, hmac_md5;
           compression_algorithm deflate;
   }
This is the same racoon configuration file used in the previous transport example.
domain-name public-key
For example:
iii.com mypublickey
This must match the domain-name used above in racoon.conf as well as the domain name used to configure the client, as shown later in this procedure. The domain name need not be defined on any DNS server; it is used only to pick the correct key from the psk.txt file and can be fictional.
tail -f /var/adm/syslog
racoon [-d][d]
Include the -d option during testing to increase the amount of information written to /var/adm/syslog; -dd provides even more detail in the log. [Turn this off for production use to prevent your syslog file from filling up with diagnostic messages.]
Check the syslog output from the previous step. Correct errors as necessary if racoon fails to start. To restart racoon, it may be necessary to delete the file /tmp/.racoon, as shown:
rm -f /tmp/.racoon
Successful startup is indicated by messages like the following in /var/adm/syslog:
   Oct 12 14:09:23 relent racoon: INFO: main.c:220: @(#)This product
    linked OpenSSL 0.9.7d 17 Mar 2004 (http://www.openssl.org/)
   Oct 12 14:09:24 relent racoon: INFO: sockmisc.c:635:
    setsockopt_bypass: in bypass
   Oct 12 14:09:24 relent racoon: INFO: sockmisc.c:660:
    setsockopt_bypass: out bypass
   Oct 12 14:09:25 relent racoon: INFO: isakmp.c:1379:
    server-ip-address[500] used as isakmp port (fd=9)
   Oct 12 14:09:25 relent racoon: INFO: sockmisc.c:635:
    setsockopt_bypass: in bypass
   Oct 12 14:09:25 relent racoon: INFO: sockmisc.c:660:
    setsockopt_bypass: out bypass
   Oct 12 14:09:25 relent racoon: INFO: isakmp.c:1379:
    server-ip-address[500] used as isakmp port (fd=10)
   Oct 12 14:09:25 relent racoon: INFO: sockmisc.c:635:
    setsockopt_bypass: in bypass
   Oct 12 14:09:25 relent racoon: INFO: sockmisc.c:660:
    setsockopt_bypass: out bypass
   Oct 12 14:09:25 relent racoon: INFO: isakmp.c:1379: 127.0.0.1[500]
    used as isakm p port (fd=11)
Once racoon has successfully started on the server, configure the Windows client. The following figures show the configuration screens for the SonicWALL client.
![]()
![]()
![]()
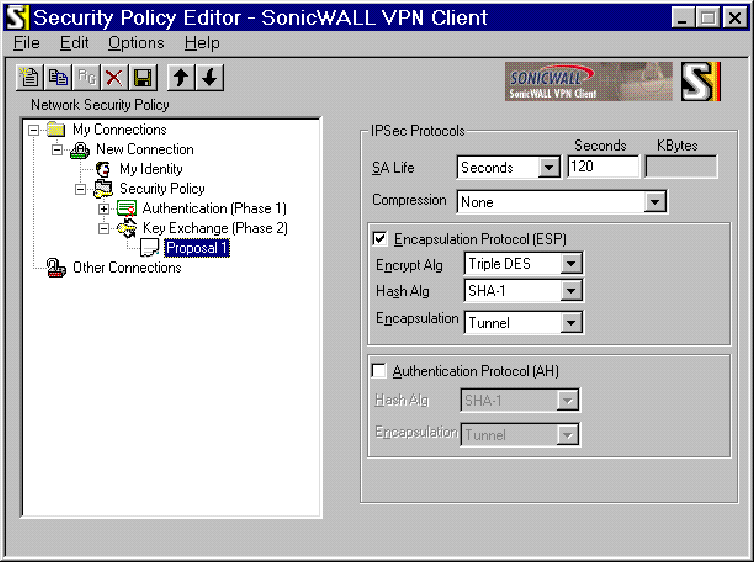
Note in particular that Tunnel is selected in the Encapsulation box.
Once both server and client are setup, generate some traffic between the systems using ssh, telnet, mozilla, etc. Check in /var/adm/syslog on the server and the client's log for connection messages.