[Next] [Previous] [Top] [Contents] [Index]
VxVM User's Guide
Plex Operations
Chapter 7
Introduction
The Visual Administrator performs plex operations by executing the appropriate Volume Manager commands. This chapter provides instructions on performing the following plex operations using the Visual Administrator:
The quick reference section at the end of this chapter provides information on the Visual Administrator plex operations menus and forms.
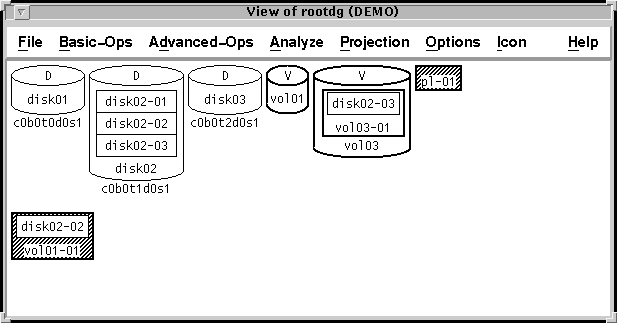
Figure 74 illustrates plex associated with a volume (vol03-01), a dissociated plex (pl-01), and a dissociated plex containing an associated subdisk (vol01-01).
Figure 74 Plex Associations
Creating a Plex
Plexes need to be created to connect subdisks to volumes. Without plexes, volumes are useless.
The creation of a plex alone is not particularly useful unless one or more subdisks are associated with that plex. If one or more subdisks have been selected at the time of the plex creation, they will automatically be associated with the new plex. A striped plex requires at least two subdisks.
Create a plex and associate it with a single subdisk as follows:
- 1. Go to the view window corresponding to the disk group in which you want to perform this operation (View of
rootdg, by default).
- 2. Create a new subdisk, as described in Chapter 8, "Subdisk Operations".
- 3. Drag the new subdisk icon beyond the borders of its disk and drop it into an open area of the view window. The Plex Create form appears. When this form is invoked in this way, it will automatically create a new plex and associate the dragged subdisk with it. The Plex Create form establishes the parameters for the plex. Some of the fields already contain default values and others are optional.
- 4. Complete the Plex Create form according to the type of plex to be created. For detailed information on this form, refer to on-line help or Table 54.
- 5. When the form is properly completed, select Apply to activate both the plex creation and the association of subdisk and plex.
A plex icon containing a subdisk icon appears. The fact that the subdisk icon is within the plex icon confirms their association.
Create a plex and associate it with multiple (two) subdisks as follows:
- 1. Go to the view window corresponding to the disk group in which you want to perform this operation (View of
rootdg, by default).
- 2. Create two new subdisks, as described in Chapter 8, "Subdisk Operations".
- 3. Select both of the new subdisks by clicking the MIDDLE button on their icons.
- 4. From the Advanced-Ops menu, select Plex, then Create. The Plex Create form appears. When this form is invoked while subdisks are selected, it will automatically create a new plex and associate the selected subdisks with it. The Plex Create form establishes the parameters for the plex. Some of the fields already contain default values and others are optional.
- 5. Complete the Plex Create form according to the type of plex to be created. If the plex is to be striped, enter a stripe width and the number of columns. For detailed information on this form, refer to on-line help or Table 54.
- 6. When the form is properly completed, select Apply to activate both the plex creation and the association of subdisks and plex.
A plex icon containing both subdisk icons appears. The fact that the subdisk icons are within the plex icon confirms their association.
Associating a Plex
Once a plex has been created, that plex can be associated with a volume. A volume is of little use until it has at least one associated plex. When multiple plexes are associated with a volume, mirroring is in effect. If the volume is already started and an additional plex is being associated, the Volume Manager will update the newer plex by copying all necessary data to that plex; this operation may take some time.
Several plexes can be associated with a single volume at a time, but only one volume can be selected per association operation. There are a few methods of associating a plex with a volume:
- Selecting the volume and plex(es) and then using menus.
- Dragging each plex icon onto the volume icon and then dropping the plex icon on that volume when the pointer (in the image of a hand) is positioned over an unobscured portion of the volume icon.
- Automatically associating one or more plexes with a volume by selecting the plex icon(s) immediately prior to the creation of a volume. See Chapter 6, "Volume Operations" for further details.
Associate a plex with an existing volume via menus as follows:
- 1. Go to the view window corresponding to the disk group in which you want to perform this operation (View of
rootdg, by default).
- 2. Select both the plex and the volume to which it is to be associated by clicking the MIDDLE button on both of their icons.
- 3. From the Advanced-Ops menu, select Plex, then Associate Plexes.
The volume and plex icons disappear momentarily and then the plex icon reappears within the volume icon. The plex is now associated with the volume.
To associate multiple plexes with a single volume, select multiple plexes along with the volume and repeat the previous procedure.
Dissociating a Plex
Associated plexes can be dissociated from their parent volumes. However, the last plex in a started volume cannot be dissociated until that volume is stopped. A plex may be dissociated if it is no longer required to reflect a copy of a volume. Plexes must be dissociated before they can be removed.
There are a couple of methods of dissociating a plex from a volume:
- Selecting the plex(es) and then using menus.
- Dragging each plex icon beyond the borders of the volume icon and then dropping the plex in an open area of the view window.
Dissociate a plex from its volume via menus as follows:
- 1. Go to the view window corresponding to the disk group in which you want to perform this operation (View of
rootdg, by default).
- 2. Select the plex to be dissociated from its volume by clicking the LEFT button on its icon.
- 3. From the Advanced-Ops menu, select Plex, then Dissociate Plexes.
The plex icon disappears momentarily and then reappears beyond the borders of the volume icon. The plex is now dissociated from its volume.
To dissociate multiple plexes from a volume, select multiple plexes (using the MIDDLE button) and repeat the previous procedure.
Detaching a Plex
A detached plex is inaccessible for reads and writes, but is still associated with a volume. One or more plexes can be detached from their parent volume at a time. The volume must be started before a plex can be detached.
Note: This operation is not permitted when the specified plex is the last valid plex on the volume.
Detach a plex as follows:
- 1. Go to the view window corresponding to the disk group in which you want to perform this operation (View of
rootdg, by default).
- 2. Select the plex to be detached by clicking the LEFT button on its icon. The selected plex cannot be the last plex in the volume.
- 3. From the Advanced-Ops menu, select Plex, then Detach Plexes.
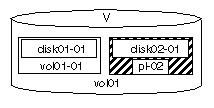
The plex icon changes color or pattern to indicate that it is now detached. Figure 75 illustrates a detached plex (pl-02). '
Figure 75 Detached Plex
To detach multiple plexes, select multiple plexes with the MIDDLE button and repeat the previous procedure.
Attaching a Plex
A plex that has been detached (either automatically by Volume Manager or by a user) can be attached to its parent volume again. This involves copying data from an active plex on the volume to the attaching plex. Depending on the amount of data to be copied, this operation may take some time.
One or more plexes can be attached to a parent volume at a time. In order for a plex to be attached, it must already be detached and still associated with an enabled volume.
Attach a plex as follows:
- 1. Go to the view window corresponding to the disk group in which you want to perform this operation (View of
rootdg, by default).
- 2. Select the (detached) plex to be attached by clicking the LEFT button on its icon. The selected plex must be detached.
- 3. From the Advanced-Ops menu, select Plex, then Attach Plexes.
When the attach process completes, the attached plex icon loses the color or shading that previously indicated that it was detached.
Removing a Plex
A plex may be removed if it is no longer required for mirroring or if the space that it occupies needs to be reused. A plex can either be removed recursively (in which case any associated subdisks are automatically removed) or manually (in which case its subdisks are left behind).
Note: A plex that is associated with a volume cannot be removed until it has been dissociated from its volume.
The Basic-Ops menu provides an option that dissociates a plex if it is still associated with a volume, then recursively removes that plex and its subdisks.
When a plex is removed via the Advanced-Ops menu, its subdisk components are not automatically removed; it is necessary to manually remove these subdisks once the plex is gone. It is generally not a good idea to leave the subdisks of a removed plex behind, as the space occupied by these subdisks cannot be used by the Volume Manager's free space pool until they are removed.
Remove a plex recursively as follows:
- 1. Go to the view window corresponding to the disk group in which you want to perform this operation (View of
rootdg, by default).
- 2. Select the plex to be removed by clicking the LEFT button on its icon. The selected plex can be either associated or dissociated.
- 3. From the Basic-Ops menu, select Volume Operations, then Remove Mirror. If the plex is associated, it is automatically dissociated. The plex icon then disappears entirely, along with any associated subdisk icons.
Remove a plex (but not its subdisks) as follows:
- 1. Go to the view window corresponding to the disk group in which you want to perform this operation (View of
rootdg, by default).
- 2. If the plex to be removed is still associated with its volume, dissociate the plex as described in the section on dissociating plexes.
- 3. Select the plex to be removed by clicking the LEFT button on its icon.
- 4. From the Advanced-Ops menu, select Plex, then Remove Plexes.
The plex icon momentarily shrinks and appears next to its previous position, then disappears entirely along with the subdisk icon. The plex is now removed, but its subdisk remains on its disk and is now categorized as a free subdisk.
To remove multiple plexes simultaneously, follow the previous steps, but use the MIDDLE button to select multiple plexes for removal at once.
Displaying and Altering Properties
The properties of the plex corresponding to a plex icon can be displayed (and potentially adjusted) in a properties form. The Plex Properties form provides detailed information about the characteristics of a particular plex.
To access the properties form for a particular plex icon:
- >>Move the pointer onto that icon and click the RIGHT button. (If the plex is under analysis, press Shift-RIGHT instead.) The Plex Properties form appears and displays details of the plex's configuration. For detailed information on this form, refer to Table 56.
Some of the displayed properties (such as the plex's name) can be altered directly through this form by editing the appropriate field(s) and then selecting the form's Apply button. Selecting the Reset button rereads the plex properties and displays the current values.
Quick Reference for Plex Operations Menus and Forms
This section provides information on menus and forms relating to plex (mirror) operations.
Plex Menus
Plex operations are accessed via the Advanced-Ops menu. Most menus provide a Help selection, which contains information relevant to the items and operations listed in that particular menu.
Table 53
Plex Menus
Menu/Submenu Access | Description |
| Advanced-Ops > Plex | Provides access to plex (mirror) operations. |
| Advanced-Ops > Plex > Create | Creates a plex. The user may select one or more subdisks to be associated with the new plex after creation. See Also: * Plex Create Form (Table 54) |
| Advanced-Ops > Plex > Remove Plex | Removes the selected plex(es). This is a permanent operation and cannot be undone. Any subdisks associated with the plex will be dissociated and left behind. Requirements: * At least one plex icon must be selected. * If the selected plex is associated with a volume, it must be dissociated before it can be removed. |
| Advanced-Ops > Plex > Associate Plexes | Associates one or more selected plexes with the selected volume. If the volume is started, the Volume Manager will begin to bring the plex up to date by copying all necessary data to the plex. This may take a fair amount of time. Requirements: * A volume icon and at least one plex icon must be selected. * Only non-associated plexes can be associated. |
| Advanced-Ops > Plex > Dissociate Plexes | Dissociates one or more selected plexes from their parent volumes. This operation will fail if the plex cannot be dissociated. For example, the last plex in a started volume cannot be dissociated. Requirements: * At least one plex icon must be selected. * Only associated plexes can be dissociated. * Before the last plex in a volume can be dissociated, that volume must be stopped. |
| Advanced-Ops > Plex > Attach Plexes | Attaches one or more selected plexes to their parent volumes. A plex must be detached or disabled but still associated with an enabled volume in order to be attached; the plex is actually being reattached with its parent volume. Requirements: * At least one plex icon must be selected. * A plex must be detached before it can be attached. * Only a plex associated with an enabled volume can be attached. |
| Advanced-Ops > Plex > Detach Plexes | Detaches one or more selected plexes from their parent volumes. A detached plex is inaccessible for reads and writes, but is still associated with the volume. Requirements: * At least one plex icon must be selected. * Only associated plexes can be detached. * This operation is not permitted when the specified plex is the last valid plex on the volume. |
| Advanced-Ops > Plex > Help | Accesses a Help window that displays information relevant to the plex operations. |
Plex Forms
Some plex operations result in the appearance of forms, which must be completed in order for that operation to proceed. Most forms provide a Help button, which contains information relevant to the fields and other aspects of that particular form.
Some form fields are required, while others are not. Fields in these forms are read/write unless listed as read only.
Plex Create Form
This form creates a plex.
Table 54
Plex Create Form
| Field | Description |
| Plex name: | Enter the name of the plex to be created. The name must be unique within this disk group. The maximum length of this field is 31 characters. |
| Plex state: | Indicate the plex utility state. This is reserved for use by usage types. This field is optional. |
| Volume: | Enter the name of the volume that this plex should be associated with. The name must be a valid volume name in this disk group. The maximum length of this field is 14 characters. This field is optional. |
| Layout: | Select the desired layout for the plex. A concatenated plex is a plex with associated subdisks that are both sequentially and contiguously arranged. A striped plex is a plex that scatters data evenly across each of its associated subdisks. The default is Concatenated. |
| Stripe unit size: | Enter the unit size of the stripes on the (striped) plex. The stripe unit size must be a number greater than 0. If no units are specified, sectors are assumed. The maximum length of this field is 14 characters. If Striped plex layout has been specified, this field is required. This field must be blank if Concatenated plex layout has been specified. |
| Number of columns: | Enter the number of columns to stripe across this (striped) plex. This must be a number greater than 0. This field is only applicable if a Striped or RAID-5 plex layout has been specified |
| Subdisks: | Displays the number of subdisks associated with the plex. This field is read only and cannot be changed. |
| Comment: | Allows you to add an appropriate comment for the plex. The maximum length of the comment is 40 characters. This field is optional. |
| Errors: | Indicates whether the plex should participate in Volume Manager error policies. The default is Participate. |
| Putil0: | Lists the permanent utility field 0. This is reserved for Volume Manager use, but may be changed. The maximum length of all Putil fields is 14 characters. This field is optional. |
| Putil1: | Lists the permanent utility field 1. This field is reserved, but may be changed. This field is optional. |
| Putil2: | Lists the permanent utility field 2. This field is reserved, but may be changed. This field is optional. |
Stripe Gap Space Form
This form provides information about a specific region of a striped plex that contains free space. This sort of free space is visually represented either as a horizontal gap between subdisks in the same stripe column of a plex or as an indentation at the beginning of a stripe column.
A gap results in a striped plex when subdisks are removed for some reason. A subdisk equal to or smaller than the size of the gap can be dropped into the gap and thus added to the column.
Click the RIGHT mouse button on a gap between subdisk icons in the same column of a striped plex icon.
Note: All fields in this form are read only and cannot be changed.
Table 55
Stripe Gap Space Form
| Field | Description |
| Plex: | The name of the striped plex containing the gap. |
| Column number: | The column number of the column containing the gap. |
| Gap offset: | The offset into the stripe column where the gap begins. |
| Gap size: | The size of this gap. |
Plex Properties Form
This form provides detailed information on the attributes of a particular plex.
Click the RIGHT mouse button on desired plex icon. If plex is undergoing analysis, click Shift-RIGHT instead.
Plex properties can be changed via this form by altering the current values in the appropriate read/write fields and then clicking on the Apply button.
Table 56
Plex Properties Form
| Field | Description |
| Plex name: | Either use the default or enter a different name for the plex. The name must be unique within this disk group. The maximum length of this field is 14 characters. The plex name can be changed by entering another name in this field. |
| Plex state: | Indicates the plex utility state. This is reserved for use by usage types. This field is read only and cannot be changed. This field is set to ACTIVE. However, for a RAID-5 log, this field is set to LOG. |
| Volume: | Lists the name of the volume that this plex should be associated with. This field is read only and cannot be changed. |
| Layout: | Indicates if the layout of the plex is concatenated, striped, or RAID-5. A concatenated plex is a plex with associated subdisks that are both sequentially and contiguously arranged. A striped plex is a plex that scatters data evenly across each of its associated subdisks. A RAID-5 plex also spreads data evenly across each of its associated subdisks. It provides self-contained parity information within each stripe. This field is read only and cannot be changed. |
| Stripe unit size: | Denotes the unit size of the stripes on the plex. If Striped or RAID-5 plex layout has been specified, this field indicates the stripe unit size. This field should be blank if Concatenated plex layout has been specified. This field is read only and cannot be changed. |
| Stripe number: | The number of stripes on the plex. This field is read only and cannot be changed. |
| Subdisks: | The number of subdisks associated with the plex. This field is read only and cannot be changed. |
| Log Subdisk: | Shows the name of the subdisk that is being used for logging on this plex. If there is no associated Dirty Region Logging subdisk (no logging in effect), this field is blank. This field is read only and cannot be changed. |
| Comment: | Allows you to add an appropriate comment for the plex. The maximum length of the comment is 40 characters. |
| Errors: | Indicates whether the plex participates in Volume Manager error policies. This field is read only and cannot be changed. |
| Putil0: | Lists the permanent utility field 0. This is reserved for Volume Manager use, but may be changed. The maximum length of all Putil fields is 14 characters. |
| Putil1: | Lists the permanent utility field 1. This field is reserved, but may be changed. |
| Putil2: | Lists the permanent utility field 2. This field is reserved, but may be changed. |
| Tutil0: | Lists the temporary utility field 0. This is reserved for Volume Manager use, but may be changed. The maximum length of all Tutil fields is 14 characters. |
| Tutil1: | Lists the temporary utility field 1. This field is reserved, but may be changed. |
| Tutil2: | Lists the temporary utility field 2. This field is reserved, but may be changed. |
| Kernel State: | Denotes the accessibility of the plex. This field is read only and cannot be changed. |
| Length: | Represents the length of the plex. This field is read only and cannot be changed. |
| Number of IO failures: | Lists the number of I/O operations that have failed on this plex. This field is read only and cannot be changed. |
[Next] [Previous] [Top] [Contents] [Index]